
Incident Management
Master the Incident List, Bulk Actions, and SLAs.
The Incident List is the tactical workspace for responders.
Why is this needed?
Alerts are typically noisy and raw; Incidents represent the actual "Work" to be done. This page turns chaotic noise into a structured queue. It ensures nothing slips through the cracks by enforcing Assignment (Who is fixing it?) and SLAs (When must it be fixed?).
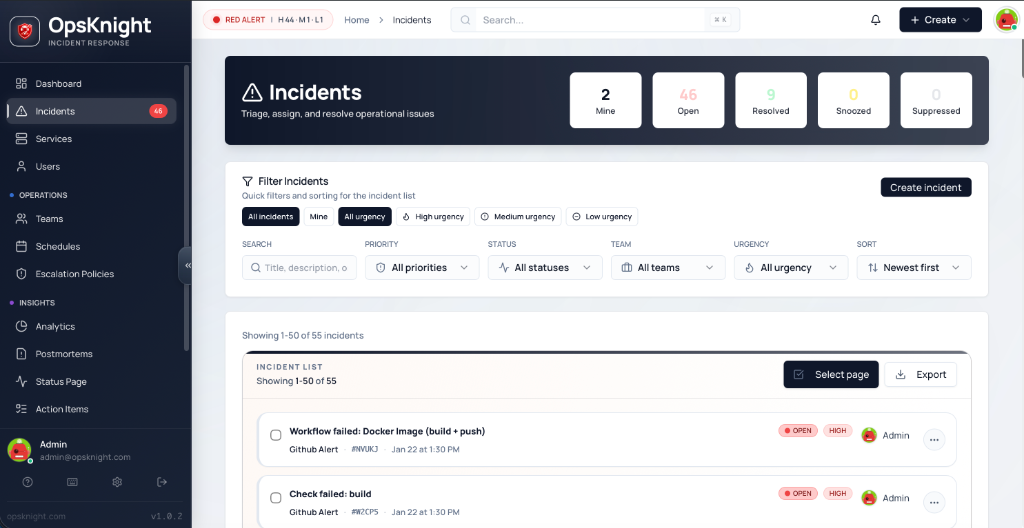
1. The Interface at a Glance
Each row in the incident list is packed with real-time operational data.
Visual State Indicators
- Status Borders: The left border color-codes the state at a glance:
- Red: Open (Needs attention)
- Amber: Acknowledged (Someone is working on it)
- Green: Resolved (Fixed)
- Grey: Snoozed / Suppressed (Hidden)
- SLA Countdowns: Two distinct SLAs are tracked:
- Time to Ack: How long until someone must look at it.
- Time to Resolve: How long until the issue must be fixed.
- Visuals: Shows "20m left" (Warning) or "Breached" (Critical) badges inline.
Navigation & Interaction
- Keyboard Navigation: Use
Up/Downarrows to highlight rows, andEnterorSpaceto open details. - Quick Preview: Clicking a row shows an "Opening..." spinner overlay while pre-fetching data.
2. Filters & Deep Search
The filter bar allows for complex querying of the incident database.
- Deep Search: Queries against
Title,Description, andIncident ID(e.g.,#5A261). - Context Filters:
- Mine / My Teams: Quickly toggle between your personal queue and your squad's workload.
- UrgencyChips: Filter by specific
High,Medium, orLowurgency levels.
- URL Addressable: Every filter state is reflected in the URL.
- Example:
?urgency=HIGH&status=OPEN&sort=priority - Pro Tip: Bookmark your team's specific view for distinct dashboards.
- Example:
3. Bulk Actions & Triage
Manage "Alert Storms" effectively with the sticky command bar.
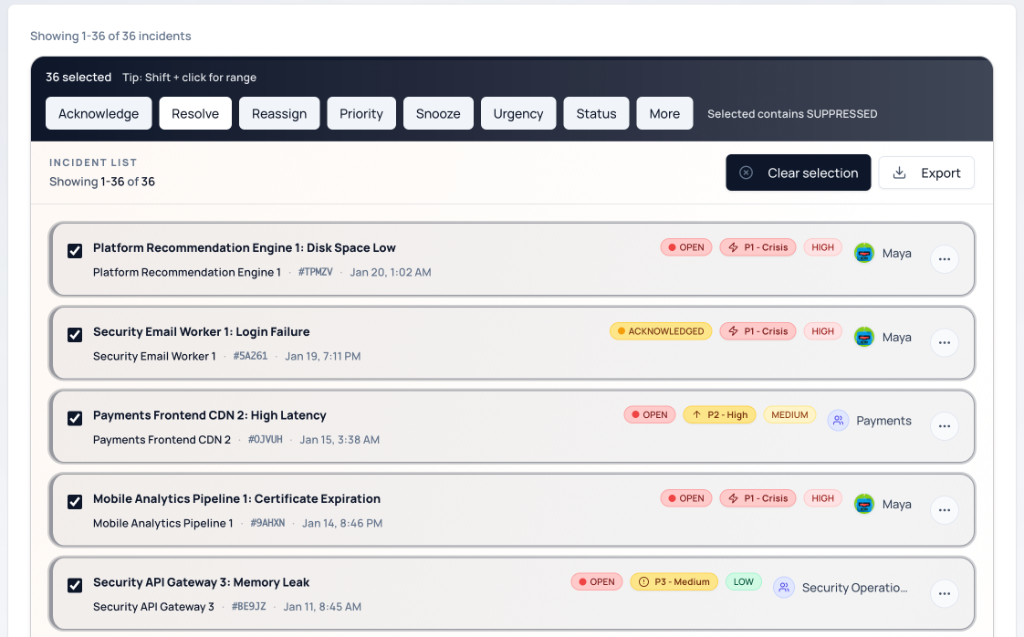
Selection Logic
- Smart Hints: The bar analyzes your selection and displays hints like "Selected contains SUPPRESSED" if you've accidentally grabbed hidden items.
Command Reference
| Action | Description |
|---|---|
| Acknowledge | Mark as seen. Stops escalation notifications. |
| Resolve | Close the incident. |
| Reassign | Transfer ownership to a User OR a Team. |
| Snooze | Hide for a duration (15m, 30m, 1h, 4h, 8h, 24h). |
| Priority | Mass-update severity (P1 - P5). |
| Urgency | Update urgency classification (High/Medium/Low). |
| Status | Force a specific status update. |
Advanced Actions ("More" Menu)
- Unsnooze: Bring snoozed items back to the active queue immediately.
- Suppress: Mark as noise/false alarm (hides from default view without resolving).
- Unsuppress: Restore suppressed items.
- Unacknowledge: Revert an incident from Acknowledged back to Open (useful if accidental).
4. Inline Management
You don't always need to open the full details page.
-
Quick Reassign: Click the assignee avatar in the list to open a search popover. You can assign to:
- Specific Users (Search by name/email)
- Entire Teams (Search by team name)
-
Status Toggles: Use the "meatball" menu (
...) on the right of any row to quickly Resolve, Snooze, or Ack that single item.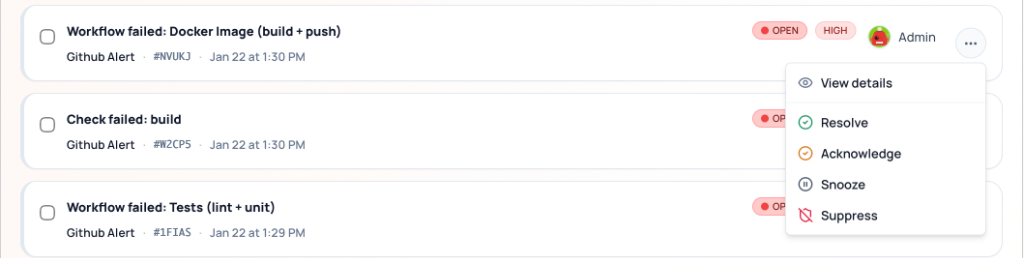
5. Incident Statuses
Incidents move through a defined lifecycle with five possible statuses:
| Status | Description | Visual |
|---|---|---|
| OPEN | New incident requiring attention. Escalation is active. | Red border |
| ACKNOWLEDGED | Someone is working on it. Escalation paused. | Amber border |
| SNOOZED | Temporarily hidden. Auto-reopens after snooze period. | Grey border |
| SUPPRESSED | Marked as noise/false positive. Hidden from default view. | Grey border |
| RESOLVED | Issue fixed. Incident closed. | Green border |
Status Transitions
         ┌──────────────────────────────────────┐
         │                                      │
         ▼                                      │
      OPEN ──────► ACKNOWLEDGED ──────► RESOLVED
         │              │                   ▲
         │              │                   │
         ▼              ▼                   │
      SNOOZED ◄────► SUPPRESSED ───────────┘
         │
         │ (auto-unsnooze)
         ▼
       OPEN
- OPEN → ACKNOWLEDGED: User acknowledges, stopping escalation
- ACKNOWLEDGED → RESOLVED: Issue fixed, incident closed
- OPEN → SNOOZED: Temporarily defer (auto-returns to OPEN)
- Any → SUPPRESSED: Mark as false positive/noise
- SUPPRESSED → RESOLVED: Clean up suppressed incidents
6. Incident Detail Page
Click any incident to open the full detail view with rich context and actions.
Header Section
- Title: Incident summary from the triggering alert
- Status Badge: Current status with quick-action buttons
- Service: The affected service (links to service page)
- Created: When the incident was triggered
Properties Panel
| Property | Description |
|---|---|
| Urgency | Impact level: HIGH, MEDIUM, or LOW |
| Priority | Business priority: P1 (critical) through P5 (minimal) |
| Assignee | Current owner — can be a User OR a Team |
| Service | The service this incident belongs to |
| Escalation Policy | The policy handling notifications |
Reassigning Incidents
Incidents can be assigned to:
- Individual Users: Direct assignment to a specific person
- Teams: Assignment to a team (any member can work on it)
To reassign:
- Click the assignee field
- Search by name/email (for users) or team name
- Select the new assignee
7. Timeline
The timeline is the complete audit trail of everything that happened during the incident.
Timeline Events
| Event Type | Description |
|---|---|
| Triggered | Incident was created |
| Acknowledged | Someone acknowledged the incident |
| Resolved | Incident was marked resolved |
| Escalated | Notification escalated to next step |
| Notification Sent | Alert sent via Email/SMS/Push/Slack |
| Note Added | User added a comment |
| Reassigned | Assignee changed |
| Priority Changed | Priority level updated |
| Urgency Changed | Urgency level updated |
| Snoozed | Incident was snoozed |
| Unsnoozed | Incident returned from snooze |
| Suppressed | Incident marked as noise |
Each event shows:
- Timestamp: When it occurred
- Actor: Who/what triggered it (user or system)
- Details: Additional context
8. Notes
Add notes to incidents to capture investigation progress, findings, or handoff information.
Adding Notes
- Scroll to the Notes section
- Type your note in the text field
- Click Add Note
Note Features
- Markdown Support: Format notes with headers, lists, code blocks
- @Mentions: Tag team members (they receive notifications)
- Timestamps: Each note shows when it was added and by whom
- Persistence: Notes remain even after incident is resolved
Best Practices
- Document investigation steps as you go
- Note any temporary fixes or workarounds applied
- Tag incoming on-call when handing off
- Include relevant links (dashboards, logs, runbooks)
9. Tags
Tags help categorize and filter incidents for better organization and reporting.
Using Tags
- Add Tags: Click the tags field and type or select existing tags
- Remove Tags: Click the × on any tag to remove it
- Filter by Tags: Use the tag filter in the incident list
Common Tag Patterns
| Pattern | Example Tags |
|---|---|
| Environment | prod, staging, dev |
| Region | us-east, eu-west, apac |
| Category | database, network, auth |
| Root Cause | config-change, capacity, dependency |
10. Resolution Notes
When resolving an incident, you can add a resolution note to document what fixed the issue.
Adding a Resolution Note
- Click Resolve on the incident
- In the modal, enter the resolution note
- Click Resolve Incident
What to Include
- Root Cause: What caused the incident
- Fix Applied: What was done to resolve it
- Prevention: Any follow-up actions needed
- Duration: How long the incident lasted
Resolution notes are visible in the incident timeline and analytics reports.
11. Postmortems
For significant incidents, create a postmortem to conduct a structured retrospective.
Creating a Postmortem
- Open the resolved incident
- Click Create Postmortem
- Fill in the postmortem template
Postmortem Sections
| Section | Purpose |
|---|---|
| Summary | Brief description of what happened |
| Impact | Users/services affected, duration |
| Timeline | Chronological sequence of events |
| Root Cause | The underlying cause(s) |
| Resolution | How the incident was fixed |
| Action Items | Follow-up tasks to prevent recurrence |
| Lessons Learned | What the team learned |
Postmortem Workflow
- Draft: Initial creation, editable
- In Review: Team reviewing and adding input
- Published: Finalized and shared
12. Creating Incidents Manually
While most incidents are created automatically via integrations, you can create them manually.
When to Create Manually
- Customer-reported issues not triggering alerts
- Internal incidents (process failures, etc.)
- Training and testing scenarios
How to Create
- Click Create Incident button
- Fill in required fields:
- Title: Clear summary of the issue
- Service: Which service is affected
- Urgency: HIGH, MEDIUM, or LOW
- Optional fields:
- Description: Detailed information
- Priority: P1-P5
- Assignee: User or Team
- Click Create
The incident follows the normal escalation flow based on the service's escalation policy.
Related Topics
- Services — Service configuration
- Escalation Policies — Notification routing
- Analytics — Incident metrics and SLAs
- Postmortems — Retrospective process
Last updated for v1.3
Edit this page on GitHub