Incident Management
Master the Incident List, Bulk Actions, and SLAs.
Incident Management
The Incident List is the tactical workspace for responders.
Why is this needed?
Alerts are typically noisy and raw; Incidents represent the actual "Work" to be done. This page turns chaotic noise into a structured queue. It ensures nothing slips through the cracks by enforcing Assignment (Who is fixing it?) and SLAs (When must it be fixed?).
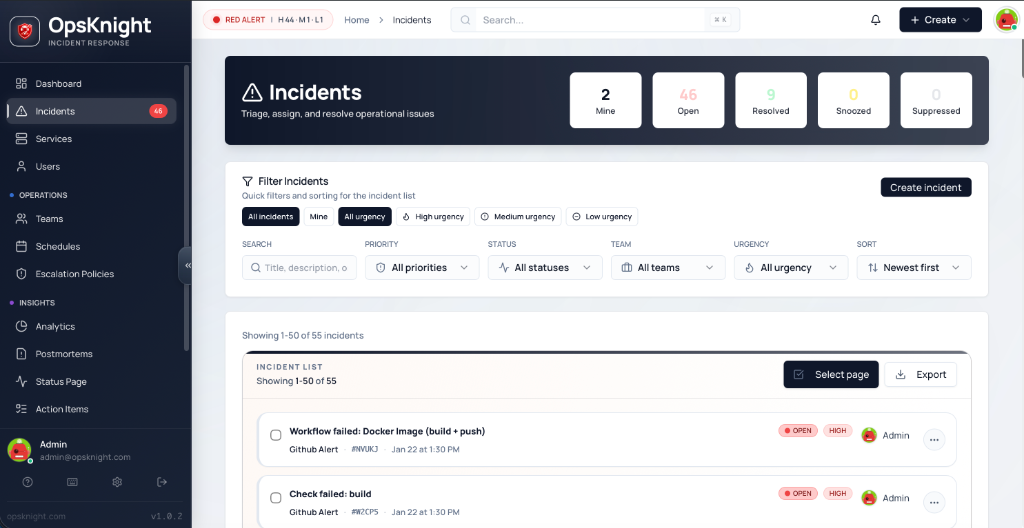
1. The Interface at a Glance
Each row in the incident list is packed with real-time operational data.
Visual State Indicators
- Status Borders: The left border color-codes the state at a glance:
- Red: Open (Needs attention)
- Amber: Acknowledged (Someone is working on it)
- Green: Resolved (Fixed)
- Grey: Snoozed / Suppressed (Hidden)
- SLA Countdowns: Two distinct SLAs are tracked:
- Time to Ack: How long until someone must look at it.
- Time to Resolve: How long until the issue must be fixed.
- Visuals: Shows "20m left" (Warning) or "Breached" (Critical) badges inline.
Navigation & Interaction
- Keyboard Navigation: Use
Up/Downarrows to highlight rows, andEnterorSpaceto open details. - Quick Preview: Clicking a row shows an "Opening..." spinner overlay while pre-fetching data.
2. Filters & Deep Search
The filter bar allows for complex querying of the incident database.
- Deep Search: Queries against
Title,Description, andIncident ID(e.g.,#5A261). - Context Filters:
- Mine / My Teams: Quickly toggle between your personal queue and your squad's workload.
- UrgencyChips: Filter by specific
High,Medium, orLowurgency levels.
- URL Addressable: Every filter state is reflected in the URL.
- Example:
?urgency=HIGH&status=OPEN&sort=priority - Pro Tip: Bookmark your team's specific view for distinct dashboards.
- Example:
3. Bulk Actions & Triage
Manage "Alert Storms" effectively with the sticky command bar.
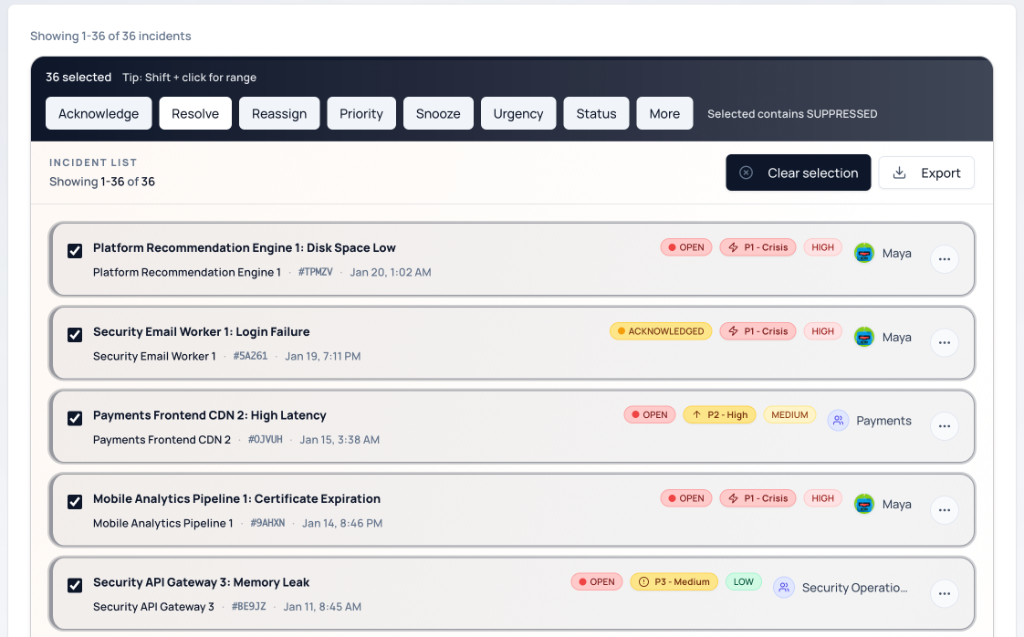
Selection Logic
- Smart Hints: The bar analyzes your selection and displays hints like "Selected contains SUPPRESSED" if you've accidentally grabbed hidden items.
Command Reference
| Action | Description |
|---|---|
| Acknowledge | Mark as seen. Stops escalation notifications. |
| Resolve | Close the incident. |
| Reassign | Transfer ownership to a User OR a Team. |
| Snooze | Hide for a duration (15m, 30m, 1h, 4h, 8h, 24h). |
| Priority | Mass-update severity (P1 - P5). |
| Urgency | Update urgency classification (High/Medium/Low). |
| Status | Force a specific status update. |
Advanced Actions ("More" Menu)
- Unsnooze: Bring snoozed items back to the active queue immediately.
- Suppress: Mark as noise/false alarm (hides from default view without resolving).
- Unsuppress: Restore suppressed items.
- Unacknowledge: Revert an incident from Acknowledged back to Open (useful if accidental).
4. Inline Management
You don't always need to open the full details page.
-
Quick Reassign: Click the assignee avatar in the list to open a search popover. You can assign to:
- Specific Users (Search by name/email)
- Entire Teams (Search by team name)
-
Status Toggles: Use the "meatball" menu (
...) on the right of any row to quickly Resolve, Snooze, or Ack that single item.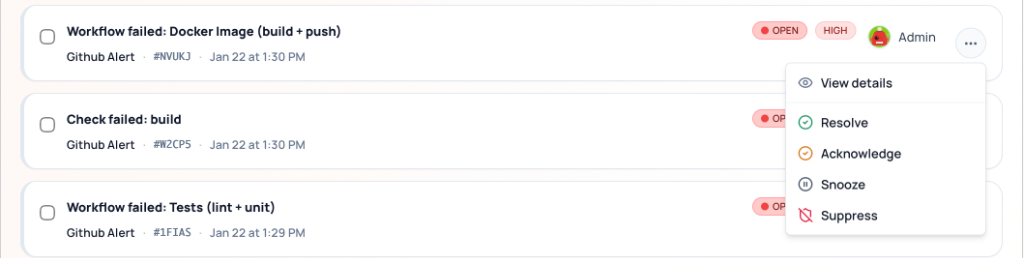
5. Incident Statuses
Incidents move through a defined lifecycle with five possible statuses:
| Status | Description | Visual |
|---|---|---|
| OPEN | New incident requiring attention. Escalation is active. | Red border |
| ACKNOWLEDGED | Someone is working on it. Escalation paused. | Amber border |
| SNOOZED | Temporarily hidden. Auto-reopens after snooze period. | Grey border |
| SUPPRESSED | Marked as noise/false positive. Hidden from default view. | Grey border |
| RESOLVED | Issue fixed. Incident closed. | Green border |
Status Transitions
         ┌──────────────────────────────────────┐
         │                                      │
         ▼                                      │
      OPEN ──────► ACKNOWLEDGED ──────► RESOLVED
         │              │                   ▲
         │              │                   │
         ▼              ▼                   │
      SNOOZED ◄────► SUPPRESSED ───────────┘
         │
         │ (auto-unsnooze)
         ▼
       OPEN
- OPEN → ACKNOWLEDGED: User acknowledges, stopping escalation
- ACKNOWLEDGED → RESOLVED: Issue fixed, incident closed
- OPEN → SNOOZED: Temporarily defer (auto-returns to OPEN)
- Any → SUPPRESSED: Mark as false positive/noise
- SUPPRESSED → RESOLVED: Clean up suppressed incidents
6. Incident Detail Page
Click any incident to open the full detail view with rich context and actions.
Header Section
- Title: Incident summary from the triggering alert
- Status Badge: Current status with quick-action buttons
- Service: The affected service (links to service page)
- Created: When the incident was triggered
Properties Panel
| Property | Description |
|---|---|
| Urgency | Impact level: HIGH, MEDIUM, or LOW |
| Priority | Business priority: P1 (critical) through P5 (minimal) |
| Assignee | Current owner — can be a User OR a Team |
| Service | The service this incident belongs to |
| Escalation Policy | The policy handling notifications |
Reassigning Incidents
Incidents can be assigned to:
- Individual Users: Direct assignment to a specific person
- Teams: Assignment to a team (any member can work on it)
To reassign:
- Click the assignee field
- Search by name/email (for users) or team name
- Select the new assignee
7. Timeline
The timeline is the complete audit trail of everything that happened during the incident.
Timeline Events
| Event Type | Description |
|---|---|
| Triggered | Incident was created |
| Acknowledged | Someone acknowledged the incident |
| Resolved | Incident was marked resolved |
| Escalated | Notification escalated to next step |
| Notification Sent | Alert sent via Email/SMS/Push/Slack |
| Note Added | User added a comment |
| Reassigned | Assignee changed |
| Priority Changed | Priority level updated |
| Urgency Changed | Urgency level updated |
| Snoozed | Incident was snoozed |
| Unsnoozed | Incident returned from snooze |
| Suppressed | Incident marked as noise |
Each event shows:
- Timestamp: When it occurred
- Actor: Who/what triggered it (user or system)
- Details: Additional context
8. Notes
Add notes to incidents to capture investigation progress, findings, or handoff information.
Adding Notes
- Scroll to the Notes section
- Type your note in the text field
- Click Add Note
Note Features
- Markdown Support: Format notes with headers, lists, code blocks
- @Mentions: Tag team members (they receive notifications)
- Timestamps: Each note shows when it was added and by whom
- Persistence: Notes remain even after incident is resolved
Best Practices
- Document investigation steps as you go
- Note any temporary fixes or workarounds applied
- Tag incoming on-call when handing off
- Include relevant links (dashboards, logs, runbooks)
9. Tags
Tags help categorize and filter incidents for better organization and reporting.
Using Tags
- Add Tags: Click the tags field and type or select existing tags
- Remove Tags: Click the × on any tag to remove it
- Filter by Tags: Use the tag filter in the incident list
Common Tag Patterns
| Pattern | Example Tags |
|---|---|
| Environment | prod, staging, dev |
| Region | us-east, eu-west, apac |
| Category | database, network, auth |
| Root Cause | config-change, capacity, dependency |
10. Resolution Notes
When resolving an incident, you can add a resolution note to document what fixed the issue.
Adding a Resolution Note
- Click Resolve on the incident
- In the modal, enter the resolution note
- Click Resolve Incident
What to Include
- Root Cause: What caused the incident
- Fix Applied: What was done to resolve it
- Prevention: Any follow-up actions needed
- Duration: How long the incident lasted
Resolution notes are visible in the incident timeline and analytics reports.
11. Postmortems
For significant incidents, create a postmortem to conduct a structured retrospective.
Creating a Postmortem
- Open the resolved incident
- Click Create Postmortem
- Fill in the postmortem template
Postmortem Sections
| Section | Purpose |
|---|---|
| Summary | Brief description of what happened |
| Impact | Users/services affected, duration |
| Timeline | Chronological sequence of events |
| Root Cause | The underlying cause(s) |
| Resolution | How the incident was fixed |
| Action Items | Follow-up tasks to prevent recurrence |
| Lessons Learned | What the team learned |
Postmortem Workflow
- Draft: Initial creation, editable
- In Review: Team reviewing and adding input
- Published: Finalized and shared
12. Creating Incidents Manually
While most incidents are created automatically via integrations, you can create them manually.
When to Create Manually
- Customer-reported issues not triggering alerts
- Internal incidents (process failures, etc.)
- Training and testing scenarios
How to Create
- Click Create Incident button
- Fill in required fields:
- Title: Clear summary of the issue
- Service: Which service is affected
- Urgency: HIGH, MEDIUM, or LOW
- Optional fields:
- Description: Detailed information
- Priority: P1-P5
- Assignee: User or Team
- Click Create
The incident follows the normal escalation flow based on the service's escalation policy.
Related Topics
- Services — Service configuration
- Escalation Policies — Notification routing
- Analytics — Incident metrics and SLAs
- Postmortems — Retrospective process
Last updated for v1
Edit this page on GitHub